Early on in web development, HTML tables were very basic and lacked extensive styling options. Today, however, most tables are styled to create a more aesthetically pleasing and functional experience for users.
CSS provides a number of attributes for styling tables. These attributes allow you to—among other things—separate cells in a table, specify table borders, and specify the width and height of a table.
This tutorial will discuss, with examples, how to style a table using CSS. By the end of this tutorial, you’ll be an expert at it.
HTML Tables
HTML code defines the structure of tables. You use the <table> tag to define a table. The <tr>, <th>, and <td> tags specify rows, table headers, and content cells, respectively.
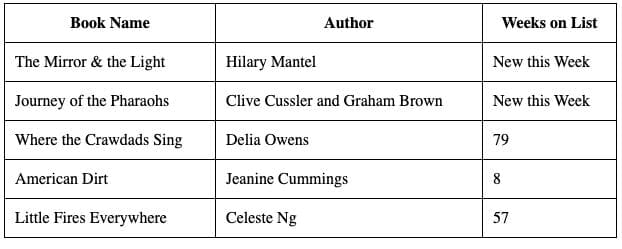
Let’s look at an example of an HTML table. In the below example, we have a table that lists the top five books on the New York Times best sellers list for the week of March 23, 2020:

The code for our table is as follows:
<table>
  <tr>
    <th>Book Name</th>
    <th>Author</th>
    <th>Weeks on List</th>
  </tr>
  <tr>
    <td>The Mirror & the Light</td>
    <td>Hilary Mantel</td>
    <td>New this Week</td>
  </tr>
  <tr>
    <td>Journey of the Pharaohs</td>
    <td>Clive Cussler and Graham Brown</td>
    <td>New this Week</td>
  </tr>
  <tr>
    <td>Where the Crawdads Sing</td>
    <td>Delia Owens</td>
    <td>79</td>
  </tr>
  <tr>
    <td>American Dirt</td>
    <td>Jeanine Cummings</td>
    <td>8</td>
  </tr>
  <tr>
    <td>Little Fires Everywhere</td>
    <td>Celeste Ng</td>
    <td>57</td>
  </tr>
</table>
This table includes three columns and six rows, including one header row.
CSS Tables
CSS is used to style tables. While the table above displays data in an organized way, it is written in plain HTML (there are no styles present). By using CSS, you can make tables more aesthetically pleasing.
There are many CSS functions you can use to style a table. Using CSS, you can:
- add borders
- collapse borders
- adjust border spacing
- adjust the width and height of a table
- add padding
- align text horizontally
- align text vertically
- add a mouse-over (hover) feature
- define cell colors
- define how empty cells will display
We cover all of these topics in the discussion below.
Borders
Suppose we want to add borders around the table or around elements within it.
To add borders, we can use the border property. Here’s an example that uses the border property to add borders to a table, and its cells, including header cells:
table, th, td {
	border: 1px black solid;
}
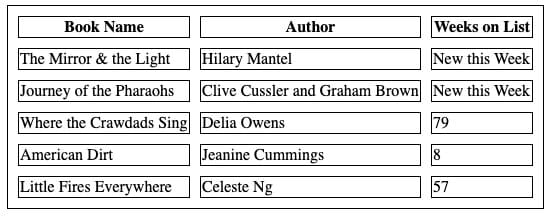
In our code, we define a solid, 1-pixel-wide, black border. Here’s the result of our code:

Notice that our table contains double borders. This is because we applied a border to the table itself (<table>), its headers (<th>), and its cells (<td>). To merge double borders into single borders, we can use the border-collapse property.
Border Collapse
The border-collapse property converts double borders in a table to single borders. The default value of the border-collapse property is collapsed. If the border-collapse property is assigned the value collapse, the borders around a table will be collapsed.
Here’s an example of the border-collapse property in action:
table {
	border-collapse: collapse;
}
Our code returns:

Our table and its contents now have a single border.
Border Spacing
You can use the border-spacing property to set the spacing between cells in a table. The border-spacing property defines the horizontal and vertical spacing between cells—and it does so in that order.
Here’s an example that uses the border-spacing property on our initial table (the one without collapsed borders):
table {
	border-spacing: 10px 10px;
}
Our code returns:

Each of our cells has a 10px spacing on both the horizontal and vertical edges.
Width and Height
You can specify the width and height of a table and its properties using the width and height attributes.
Suppose we want the width of our above table—the one with collapsed borders—to be the width of the web page itself. And, let’s suppose we want the height of each table header to be 30 pixels tall. We can do this using the following CSS code:
table {
	width: 100%;
}

th {
	height: 30px;
}
Our code returns:

As you can see, our table is now the width of the web page. In addition, the column headers in our table are 30 pixels tall.

"Career Karma entered my life when I needed it most and quickly helped me match with a bootcamp. Two months after graduating, I found my dream job that aligned with my values and goals in life!"
Venus, Software Engineer at Rockbot
Padding
You can use the padding property to add a certain amount of space between the borders of the cells in a table and the contents of those cells. The padding property can be used on the <td> and <th> tags.
Suppose we want to add a 10 pixel padding around the contents of our table’s cells—including the header cells. We can do so using this code:
th, td {
	padding: 10px;
}
Our code returns:

The contents of each of our table rows and headers now has a 10px padding around all edges.
Horizontal Text Alignment
You can use the text-align property to horizontally align text stored in a <th> or <td> tag in a table. By default, <th> elements are center aligned and <td> elements are left aligned.
The text-align attribute’s most commonly used values are:
- left, center, right (supported by all browsers except Microsoft Edge and Internet Explorer)
- start and end (supported by all browsers except Microsoft Edge and Internet Explorer)
Suppose we want to center the <td> elements in our table and align the <th> elements to the left of each cell. We can do so using this code:
th {
	text-align: left;
}

td {
	text-align: center;
}
Our code returns:

In this example, we center-aligned non-header cell text and left-aligned header cell text.
Vertical Text Alignment
The CSS vertical-align property is used to specify the vertical alignment of content in <th> or <td> tags. By default, the value of the vertical-align property is set to middle, which means the content is vertically aligned to the middle of the cell.
Let’s suppose we want to align the text in our <td> cells to the bottom of the cells. We can do so using this code:
td {
height: 40px;
vertical-align: bottom;
}
Our code returns:

In this example, we set the height of each <td> cell to 40 pixels. Then we vertically aligned the contents of those cells to the bottom of the cells.
Horizontal Borders
When you’re creating a table, you may decide that you only want borders to appear at the bottom of each cell. You can apply the border-bottom property to <th> and <td> cells to do so.
Here’s the code we can use to create a horizontal lower border for each cell in our table:
th, td {
	border-bottom: 1px solid black;
}
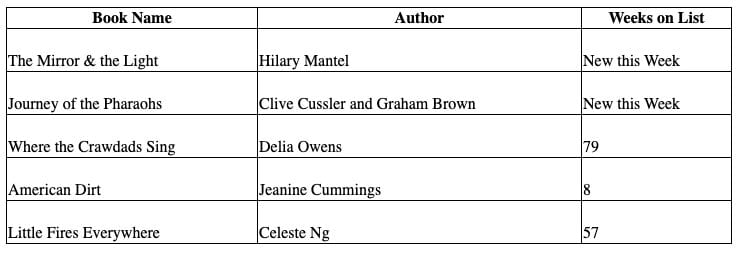
Our code returns:

In this example, we created a solid, black, 1-pixel-wide bottom border for each cell in our table.
Mouse Over (:hover)
If you use the :hover selector in your code, the browser will highlight table rows when a user hovers over them with the mouse.
The :hover selector is useful because it allows you to make your tables more interactive. It also helps users better visualize individual rows when they are looking at the table.
Suppose we want the background color of the rows (<tr>) in our table to change to light gray when the user hovers over them. We can do so using this code:
tr:hover {
background-color: lightgray;
}
Our code returns:

When we hover over a table row, the color of the row changes to light gray. In this case, we hovered over the fourth row of our table, so the color of that row turned to light gray.
Table Colors
You can use the color property to specify the background and text colors of elements in a table. Suppose we want our table header cells to have a gray background and white text. We can use the following code to style the table that way:
th {
	background-color: gray;
	color: white;
}
Our code returns:

In this example, our table’s header cells (<th>) have gray backgrounds. We also set the text in each header cell to white. We defined both of these characteristics using the CSS color property.
Striped Design
When you’re designing a table, you may want to use the zebra-styled approach. In this style, row colors alternate between two colors. This creates a striped, zebra-like effect. To accomplish this task, we can use the nth-child() selector.
Here’s the code we will use to create a striped design wherein we set the background color of every other row to light gray:
tr:nth-child(even) {
	background-color: lightgray;
}
Our code returns:

We set the background color of every even-numbered row in our table to light gray.
If we want to set the background color of odd-numbered rows in our table to light gray, we can specify “odd” instead of “even” in the code above.
Empty Cells
We use the empty-cells property to specify whether cells should have any borders or background if they do not contain any text.
The empty-cells property takes one of two values: hide or show. CSS does the following to empty cells when a user specifies one of these values:
- hide: hides the background color and borders.
- show: shows the background color and borders.
The empty-cells CSS property only works if border-collapse is set to separate. This means that the borders are not collapsed.
Suppose that we have an empty cell in our table above and want to hide the background and borders of that empty cell. We can use the following code to accomplish this task:
table {
	empty-cells: hide;
	border-collapse: separate;
}
Our code returns:

In this example, we removed the Weeks on List value for the book Where the Crawdads Sing. Because that cell contains no value, when we specify the value hide for the empty-cells attribute, the table hides the border element that otherwise would have been applied to the cell.
Conclusion
CSS offers a number of properties used to style tables. These include the padding property (adds space between the contents of a cell and its borders) and the text-align property (aligns the text inside a cell).
This tutorial discussed, with examples, how to style a table using CSS. Now you’re ready to start styling tables in CSS like a pro!
About us: Career Karma is a platform designed to help job seekers find, research, and connect with job training programs to advance their careers. Learn about the CK publication.


