Sometimes the best way to get into game design is to jump right in. Getting to see the results of your own work moving on the screen is exciting, and that creative excitement is the best fuel to get into game design.
This tutorial will show you how to begin making a game with Unity, starting with an idea. You will learn a little bit about how to make 2D Unity games. Additionally, you will learn a good startup method for making Unity 2d games from scratch.
It’s important to note that this tutorial will not make you a full fledged Unity developer or teach you how to code video games. It will, however, guide you towards making something work on screen quickly.
Unity is one of the most popular free game engines available. It also has an excellent 2D engine, so no 3D models are needed. Another attractive feature of Unity is that it doesn’t require an extensive knowledge of programming.
Game development with Unity is good for creating things that have already been built. Hollow Knight, a fantastic metroidvania platformer, and Ori and the Blind Forest were created on Unity, for example. In short, Unity is perfect for designing smaller-scale indie games.
Below, here is a step by step tutorial on how to make a 2d game in Unity for beginners.
Step 1: Idea
Before getting started, decide what kind of game you’re making. To figure this out, here are a couple game design questions you should ask yourself:
- Is it a platformer, a top down game, or maybe isometric?
- What will the theme and basic story be?
- What will it look like?
- What engine will you use?
- Most importantly, how will your game stand out? What new mechanic or idea does it introduce, or what will it do well?
Although you don’t need solid or specific answers to most of these questions, you do need a general idea of what you’re going to make before you start. You can expand on this idea and create a basic prototype for it later. Some people like to do this on paper, while others can just brainstorm.
To begin, let’s make a platformer. For this example, the platformer’s special rule is that a player has to control two characters at once to solve puzzles, and the characters have to meet to complete the level.
Once you have a few ideas on what to make, you have a guide to get you started. Now, you can move on to the prototyping.
Step 1.5: Get your tools
In order to design a game in Unity, you’ll need Unity. You can download the personal version here. Keep in mind that the personal version is only necessary if you haven’t gained more than $100k in funding or revenue for your game. Once you’ve done that, you hopefully won’t need this tutorial.
Begin by downloading the ‘Unity Hub.’ Then, open the hub, go to ‘Install,’ and click ‘add.’ This tutorial will use Unity version 2019.2.14f1. You can install any packages you’d like or have space for, depending on what targets you want your game to run on. This tutorial will run the game on Windows, so make sure the ‘Windows build support’ box is checked.

You can also design graphics for your game. Since Unity involves pixel art, I highly recommend using GraphicsGale. GraphicsGale free, easy to use, and comes with a ton of features. However, feel free to use whatever editor you’re comfortable with, whether that be Photoshop, Blender, or Windows Paint. As long as you can make images with transparent backgrounds, you should be fine.
Step 2: Setup your project
While Unity is installing, you can take the time to prepare some of your resources. You will need some stand-in graphics, called placeholders, so that you can see what you’re making. It will take a while to draw all of your character animations, enemies, and the environment, so you can get started with simple graphics.
We use using GraphicsGale for this tutorial, but you can use any editor you like. Start by making a stand-in for your walls in the game. (Remember, you can always make more later.) The walls should be 100 pixels by 100 pixels in size.
Here is an example:

Once Unity has finished downloading, you can open up the Unity Hub and start a new project. Name the project whatever you’d like, but be sure to select 2D for the project setup.
Welcome to Unity! You should now be looking at the Unity Editor. To navigate the 2D space in the editor window, use the middle mouse button to pan and the scroll wheel to zoom. The camera in the middle of the space represents what the player will see.
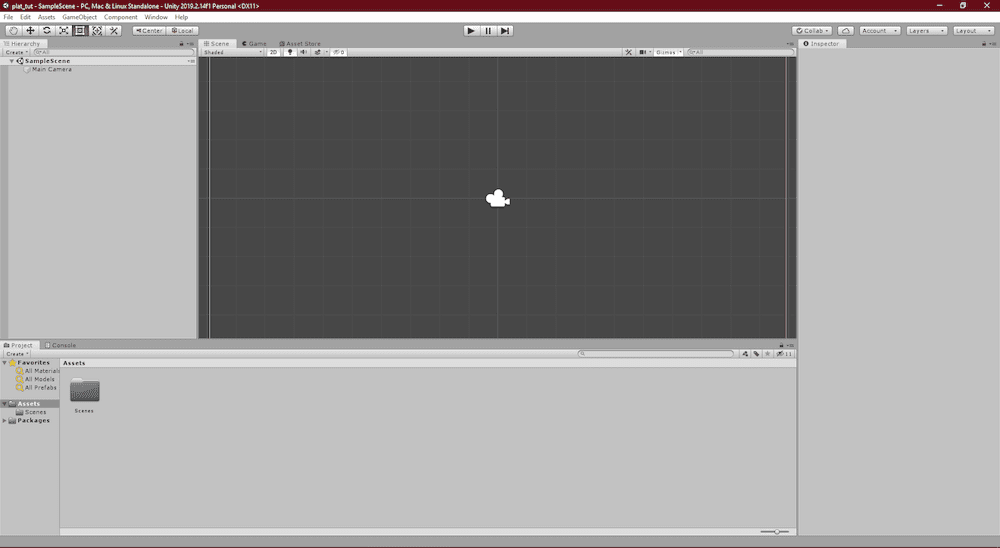
Unity has an incredible feature called the Unity Asset Store. The Asset Store is full of prebuilt chunks of game like models, textures, utilities, or AI programs. These are available for sale, and some are even offered for free. Because of this, it’s easy to build a game without having to make too many assets yourself. You can simply take pre-coded game mechanics and attach them to your own art.
To access these free, basic programming assets, simply go to the ‘Asset Store’ tab near the top of the view window. From here, go to ‘top free assets,’ and download the ‘Standard Assets (for Unity 2017.3)’ package. You may have to sign in or make an account.

Once the package has downloaded, press ‘Import’ (it replaces the download button after the assets have downloaded) to import the package into your current Unity project. You’ll be presented with a long list of checkboxes. What you add from the package is up to you. For this tutorial, you only need the ‘2D’ folder and ‘CrossPlatformInput’ folder under ‘standard assets.’
You will also need some tools for making 2D games in Unity that will help you out quite a bit. Go to this link, and download the Git as a zip. Then, unzip and drag and drop the folder inside into your asset browser. You may have to restart Unity afterwards to make it work properly.
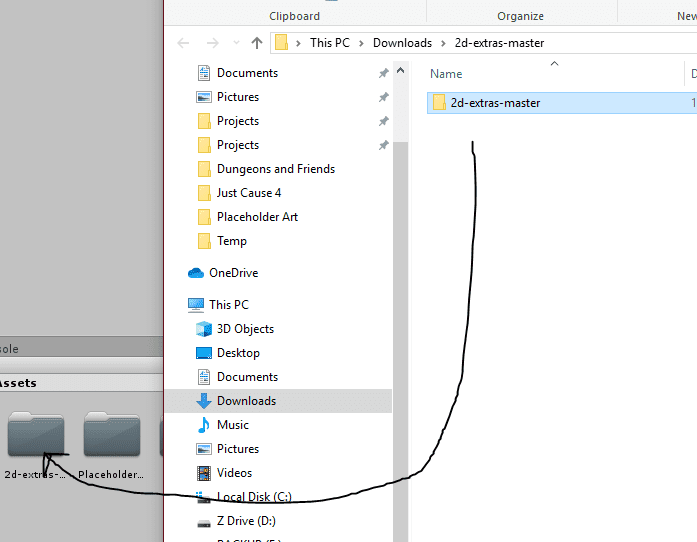
Now, you should have everything you need to get started. It’s time to dig in and start making it work.
Step 3: Make the map
To begin making the map, first return to the ‘Scene’ tab. In the asset browser, at the bottom of your screen, right click and click create>folder. Name the new asset folder “Tiles.”
You will also want to add your placeholder art to the asset browser. Simply drag and drop the whole folder from windows into the asset browser.
Next, make a palette that will serve as the blocks for your character to run into. Go to Window>2D>Tile Palette to open the Tile Palette window. Click ‘create a new palette’ to make a new tile palette. Name it “solid,” but keep all of the defaults and save it to the folder called ‘Tiles.’
| A note on organization |
| It’s easy to make folders when you need a folder or file, and then leave it wherever you created it. While this is fine if you plan on making a tiny game with three sprites, it isn’t a good idea if you plan to expand your game into something bigger. As your project grows, the lack of organization will come back to bite you. |

"Career Karma entered my life when I needed it most and quickly helped me match with a bootcamp. Two months after graduating, I found my dream job that aligned with my values and goals in life!"
Venus, Software Engineer at Rockbot
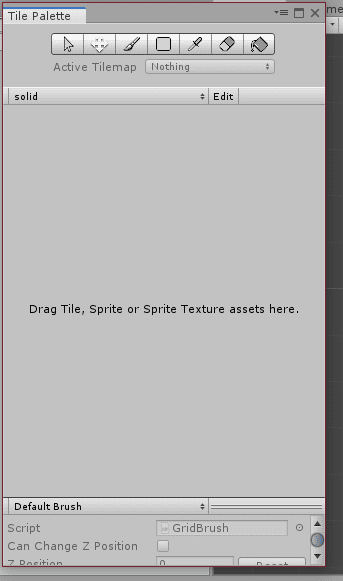
To add art to the palette, simply drag and drop your placeholder art for level blocks into the above window.
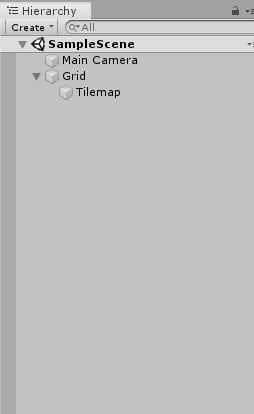
Next, create something to paint on with your palette. In the Hierarchy window, right click and go to 2D Object>Tilemap.
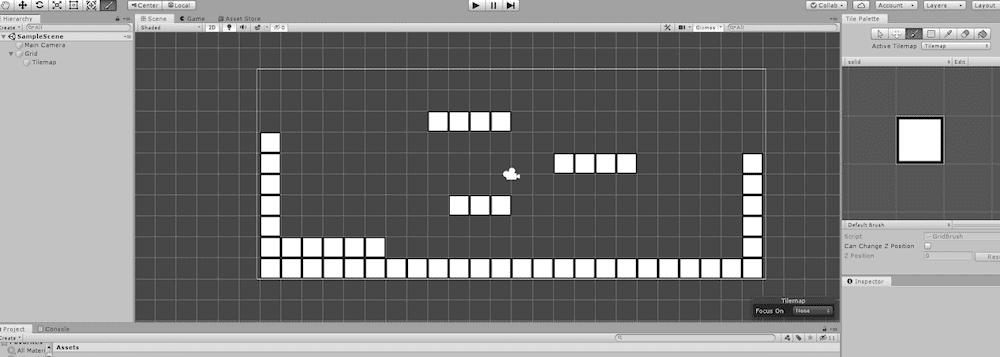
Now you should be able to paint in your level. Try to keep it inside the camera bounds for now, and add a few platforms to jump on.
Finally, there is one last step to take care of. Right now your map is only visuals, and your character won’t run into the walls you’ve made. In fact, your character will fall right through the floor. You should add a physics property to let the game know that these squares matter, and they aren’t just there to look pretty.
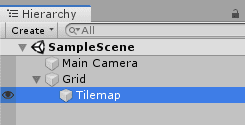
To add a physics property, click on the tilemap in the editor, and then scroll down in the Inspector window (on the other side). Click the ‘Add Component’ button.
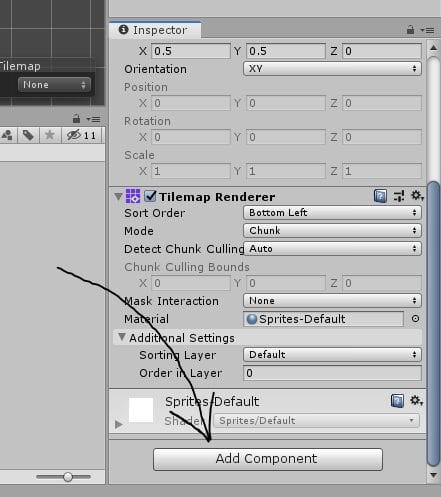
The component you need to add is called ‘Tilemap Collider 2D.’ Just use the search box to find it and add it to your tilemap.
Step 4: Make the player
Now that you have a map, the next step is to create someone to move around on it. Fortunately, Unity has done most of the hard work for this step. If you visit the standard assets folder>2D>Prefabs in the Assets Browser, you’ll see they have a little robot there called ‘CharacterRobotBoy.prefab.’
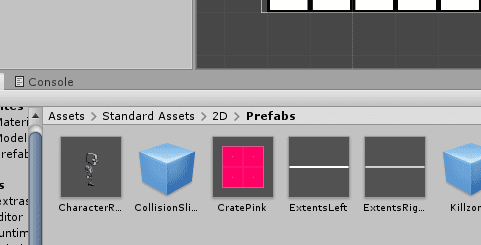
This is a prefab. Remember how your tilemap has a collision component attached to it? Well, our character needs many components attached to it in order to function. Instead of rebuilding each component every time, you can make prefabs to serve as game objects. These can be used over and over.
Now, drag the robot boy into your scene and click on him in the hierarchy. Looking at all the components attached to him in the Inspector, you will notice that he has an animation system, a sprite renderer, and several different collision and control functions.
Although you can use him for now, you should make your own character to replace him eventually. His sprite and animation will serve as stand-ins as you continue to develop around him.
Now that the robot boy is in your scene, you can play as him. Press the play button at the top of your screen to try it out.
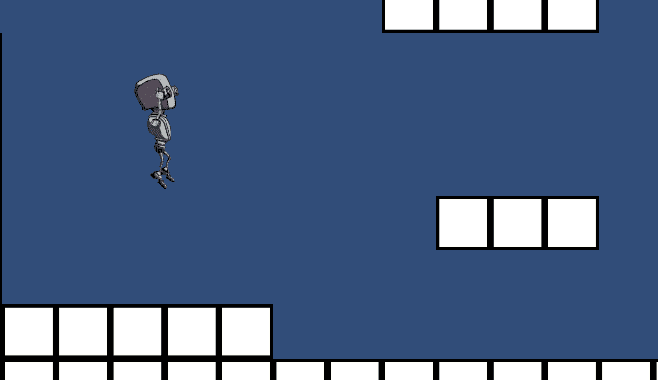
Since the idea for a game mechanic in this tutorial is to have two characters meet, you should drag and drop a second robot boy into the scene, perhaps on the other side. This way, every time you play the game, you will have to coordinate to make the two characters meet.
Step 5: Roadmap and build
The roadmap is one of the many steps that you can take from here. Now that you have a prototype, all of the time-consuming setup work is done.
Creating a roadmap is a great way to plan an indie game. You can make a roadmap by thinking of all the features you want in the game, laying them out on a timeline, and interspersing them with time to make improvements and fix bugs.
For example, your roadmap could look something like this:
- Add coin system
- Add player health and damage
- Basic enemies
- Bug check
- Refine base art
- Create game over and win scenarios
- Add UI elements
- Add Menu system
- Etc.
This starts putting the game’s scope into perspective, and it helps you to see how much work is left between this prototype and a finished game. Knowing this distance is important, as you don’t always have unlimited time and attention to pour into a game. For example, you might have a deadline for a game jam.
Roadmapping also helps to keep your expectations in check, and it gives you something to follow. After you create a roadmap, the next step is to follow it as you continue to improve your game.
This tutorial has only taken you through the start of a game; the rest is up to you. Unity has an active community, and there are many teaching resources that go far beyond the scope of this simple game tutorial. Some of the best teaching resources include coding or game design bootcamps. The road to becoming a game developer starts with your first game, no matter how simple, and it only grows from there.
About us: Career Karma is a platform designed to help job seekers find, research, and connect with job training programs to advance their careers. Learn about the CK publication.


