When building a web app, it is inevitable that we will have to create something from data a user inputs. This could be creating a new user account when someone submits their information through a sign up form, or creating a new recipe from your awesome new recipe organizer app. Going from user data in a form to a fresh new instance of a recipe saved to your database requires a HTTP POST request.
A POST request is what sends the data from the form to the server where it can be created in a backend or API and saved to a database. By default, submitting a form requires a redirect or page refresh. While this is perfectly fine for small apps, we want to provide a quicker loading experience so we will override this behavior
Using the jQuery post() request allows us to make the HTTP request, get back a response, and choose how we display the data all without a redirect or refresh! Let’s look a little closer at what post() needs in order to do all of this.
A Closer Look at post()
HTTP requests are like a game of catch. The browser throws a request to the server via API endpoint, and the server throws back a response. What post() does is send data to the endpoint that will be created and saved in the app’s database.
Taking all of the above into consideration, we can assume post() takes some arguments, right? Right! post() takes up to four arguments, but for our purposes, we are focusing on the main two: the URL destination and the data we are sending to that destination.
$.post(‘/recipes’, data)
Taking our recipe organizing app example, we begin with our jQuery selector $. By invoking the post() method, we are sending our data to the URL of ‘/recipes.’ So far, so good. We’ve thrown some data to our server. Now, we get ready to catch the response!
What comes back to us as a response is what is known as a jQuery XHR object, or jqXHR, which implements the Promise interface. Not to worry! Although that last sentence may sound scary, it’s telling us that the response is just an object. With jQuery’s handy done() method, that object can be organized into a more legible format.
Keeping with our game of catch analogy, we throw data to the server with post(). We are thrown back a jqXHR object, which we pass to done() so we can see what we caught. Now that we’ve closely examined post(), let’s see how to use it.
jQuery post()
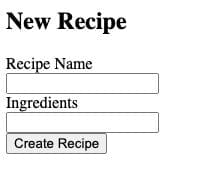
To begin, we have a plain HTML form:
script src="https://ajax.googleapis.com/ajax/libs/jquery/3.5.1/jquery.min.js"></script>

<h2>
  New Recipe
</h2>
<form id='new-recipe'>
<label for="name">Recipe Name</label><br>
<input type="text" name="name" id="name"><br>
<label for="ingredients">Ingredients</label><br>
<input type="text" name="ingredients" id="ingredients"><br>
<button type="submit">
Create Recipe
</button>
</form>
Which displays the form as such:

By default, when a submit button is clicked, the browser will refresh or redirect. Remember we want to avoid a page refresh or redirect? If the page refreshes or redirects, we lose all of our data from the form. To avoid redirecting and losing data, we have the JavaScript preventDefault() method.
<script>
  $(document).ready(() => {
    $('#new-recipe').submit((event) => {
      event.preventDefault();
    })
  })

</script>
We are waiting until the page or document loads, then listening for then the submit button is clicked on the form with an id of new-recipe. This is accomplished with the .submit() method that takes a callback function with the click event as an argument. To review, a JavaScript callback function is a function we can pass as an argument to another function to be executed later.
From inside this callback function, we can stop the default redirect with preventDefault(). Now, we are no longer redirecting and can begin to submit some data to the server.
Before we invoke post() to send data, we need data! Where do we get this data from?
We get the data from the form. Since we are no longer redirecting, we have access to the values in the text inputs of the form. What’s going on with that serialize() method?
The serialize() method is called on the form we have selected with the this keyword. What serialize() does is convert the form data into a text string in standard URL-encoded notation, which can be sent to the server.
Once we have properly serialized our form data, we store it in a variable:
  $(document).ready(() => {
    $('#new-recipe').submit((event) => {
      event.preventDefault();
     var values = $(this).serialize();
    })
  })
Now we have our data stored in the values variable, we can now send it off to the server!
  $(document).ready(() => {
    $('#new-recipe').submit((event) => {
      event.preventDefault();
     var values = $(this).serialize();
     var posting = $.post('/recipes', values);
    })
  })
Remember that post() returns the jqXHR object? We can save that as a variable as well and call done() on it to unpack the response and deal with it as we choose on our client side.
$(document).ready(() => {
    $('#new-recipe').submit((e) => {
      e.preventDefault();
      var values = $(this).serialize();
      var posting = $.post('/recipes', values);
      posting.done( (data) => {
        var recipe = data;
        $('.recipes').text(recipe["name"]);
        $('.recipes').text(recipe["ingredients"]);
      })
    })
  })
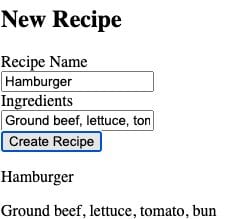
After receiving the data and storing it in a more legible variable of recipe, we can access the name and ingredient attributes. For the sake of example, we inserted these attributes into a <div> with a class of recipes.

Conclusion
We’ve covered a lot of ground here! Before we celebrate learning about post(), let’s quickly recap what we’ve learned.
A common use for post() is inside of .submit() as a callback function. Since .submit() is called on the form itself, we can use the JavaScript this keyword to refer to all the data in the form and serialize() it. After we store the serialized data into a variable, often called values, we can send these values to our destination URL using post().
It’s a good habit to store the jqXHR object returned by post() in a variable commonly called posting. From here we use the handy done() method on our posting variable, and now we have access to the data the server responded back with. It’s now up to you on how you display the data to your user.
Take a moment to congratulate yourself on tackling the complex process of post()! If you’re at this stage of building your own app, remember that errors happen. Stay calm and debug!

"Career Karma entered my life when I needed it most and quickly helped me match with a bootcamp. Two months after graduating, I found my dream job that aligned with my values and goals in life!"
Venus, Software Engineer at Rockbot
About us: Career Karma is a platform designed to help job seekers find, research, and connect with job training programs to advance their careers. Learn about the CK publication.


