The CSS padding property creates a space between an element’s borders and content contained inside of that element. Padding has subproperties that allow for unique padding sizes on all sides and accepts inherit, length, and percentage as values.
When you’re designing a web element, you may want a space to appear between the contents of the element and its borders. For instance, if you’re designing a box with text inside, you may want some space between the text inside the box and the borders of the box.
That’s where the CSS padding property comes in. The CSS padding property creates a space between the contents of an element and the borders defined for that element.
This tutorial will discuss, with examples, how to use the padding property in CSS.
CSS Padding
The CSS padding property allows you to add space between an element and its borders.
The padding property is shorthand for the four CSS padding subproperties that set the top, right, bottom, and left sides of an HTML element.
The padding for a box is different from the margin property in CSS. Whereas the padding property allows you to add space within the borders of an element, the margin property allows you to add space around the outside of an element’s borders.
SPACE-ADDING PROPERTIES IN CSS
| PROPERTY | FUNCTION |
| padding | Adds space between an element and its borders. |
| margin | Adds space around (outside) the borders of an element. |
CSS Padding Individual Sides
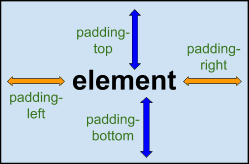
There are four properties used to specify the padding for each side of an element. These are:
- padding-top
- padding-right
- padding-bottom
- padding-left
See below for a visual representation of the four subproperties of padding in CSS.
Visual Representation of CSS Padding Subproperties
In CSS, all padding properties can accept three different values. These are:
- inherit. Specifies the padding that an element should inherit from a parent.
- length. Defines the length of an element’s padding (in px, em, cm, etc.).
- percentage (%). Specifies the padding of an element as a percentage of it’s parent element’s width.
Suppose we are designing a box for a website. We want the box to have a 25px padding on the left and right sides, and a 40px padding above (top) and below (bottom) the box.
We could use the following code to accomplish this task:
index.html

<div class="box">
  <p>
  This is a box
  </p>
</div>

styles.css

.box {
	padding-top: 40px;
	padding-bottom: 40px;
	padding-left: 25px;
	padding-right: 25px;
	border: 1px solid blue;
}
Our code returns:

In this example, we defined a <div> element to create our box model. Inside our <div> tag is a <p> tag. This <p> tag contains the text This is a box. We also created a CSS property called .box that stores the styles we apply to our <div> tag.
Our CSS property sets the padding for the top and the bottom of our box to 40px and the padding for the left and right sides of the box to 25px. We also specified a 1px solid blue border around our box. This allows us to see the padding effect in action.
While this code is clear, there is a way to shorten it. We can do so using the CSS padding shorthand property. We may decide to do this to make our code more readable.
CSS Padding Shorthand
The padding property (aka “padding attribute”) is shorthand for the four above-mentioned individual padding properties in CSS. By using the padding property, you can define the padding for an HTML element on one line.
The syntax for the padding shorthand is as follows:
padding: value1 value2 value3 value4;
When using the padding attribute, you must specify at least one value.
The padding shorthand works in different ways depending on how many values you specify. Let’s walk through an example of how the padding property works in all potential use cases.
Four Values
Suppose you want to add padding on all sides of a HTML element.
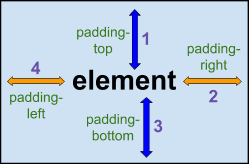
You can do so by using the padding property and specifying four values. The values you specify should use the following order:

"Career Karma entered my life when I needed it most and quickly helped me match with a bootcamp. Two months after graduating, I found my dream job that aligned with my values and goals in life!"
Venus, Software Engineer at Rockbot
- The first value is the top padding.
- The second value is the right padding.
- The third value is the bottom padding.
- The fourth value is the left padding.
Consider the below visual representation for a depiction of this.
Visual Representation of Numbered CSS Padding Subproperties
Here’s an example that uses the padding property to add padding around all four sides of an element:
.box {
	padding: 40px 25px 40px 25px;
	border: 1px solid blue;
}
Our code returns:

In this example, we used the padding property to add padding around the contents of our box. Here are the values we specified for our padding:
- Top: 40px
- Right: 25px
- Bottom: 40px
- Left: 25px
We also specified a 1px-wide solid blue border to make it easy to see where we applied the padding. As you can see in the above example, we are able to define an element’s padding using just one line of code (instead of four).
Three Values
If you want the right and left paddings of an element to be the same, but you want to use different top and bottom values, you can specify three values using the padding property.
Here’s the order in which values should appear when specifying three values with the padding property:
- The first value is the top padding.
- The second value is the right and left padding.
- The third value is the bottom padding.
Suppose we want to create a box with a 50px top padding, 75px bottom padding, and 100px padding on both the left and right sides. We can do so using this code:
.box {
	padding: 50px 100px 75px;
	border: 1px solid blue;
}
Our code returns:
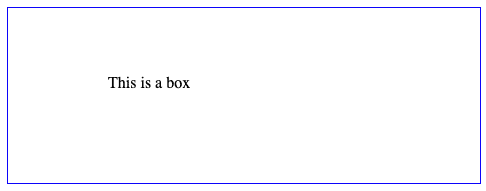
In this example, the padding on both the left and right sides of the box is 100px, but we specified different padding values for the top (50px) and the bottom (75px) of the box.
As in the examples above, we specified a blue border around our box so we can see where our padding takes effect.
Two Values
If the top and bottom paddings of an element should be the same, and the right and left padding should also be the same, you can specify two values with the padding property.
The order in which values should appear if you specify two paddings with the padding property is:
- The first value is the top and bottom paddings.
- The second value is the right and left paddings.
Let’s suppose we want to create a box with 50px padding on the top and bottom of the element, and 75px padding on the left and the right sides of the element. We can do so using this code:
.box {
	padding: 50px 75px;
	border: 1px solid blue;
}
Our code returns:
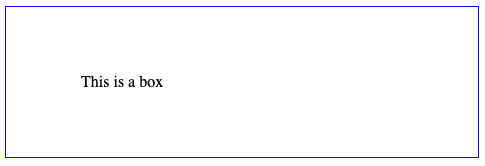
In this example, the padding for the top and bottom of our box is the same: 50px. The padding for the left and right edges of the box are both set to 75px.
As above, we also specified a blue border so we can easily see the padding around our box.
One Value
If you want to add the same amount of padding around all sides of an element, you only need to specify one value when using the padding attribute. The one value you specify is the padding that will be applied to all sides of a particular element.
Here’s an example of a CSS style that will add a 20px padding around all edges of the elements within a box:
.box {
	padding: 20px;
}
Our code returns:

Our above box has a 20px padding around every edge of the element within the box.
Padding, Width, and the Box-Sizing CSS Property
Often, when you’re designing an element in CSS, you’ll use the width property to specify the width of an element. However, if you use the width property in combination with the padding property, a few problems can arise.
If you apply padding to an element with a specific width, the padding specified for that element will be added to the total width of the element. So, for instance, if you’re designing a box that should be 200px wide and specify a padding of 20px, the total width of the box will be set to 240px (20px for the left padding + 20px for the right padding).
Here’s a code snippet that illustrates this effect in action:
.box {
	width: 200px;
	padding: 20px;
	border: 1px solid blue;
}

.box2 {
	width: 200px;
	border: 1px solid blue;
}
Here is the result of our code:
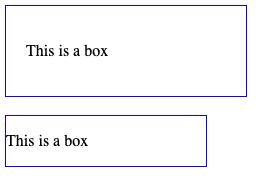
On the top we have a box with a 20px padding, and on the bottom we have a box with no padding. As you can see, the total width of the second box is 200px. However, for the reasons we discussed earlier, the total width of our first box is 240px.
If we want our top box to have the width 200px even if a padding value is specified, we can use the box-sizing CSS property. Here’s an example of this property in action:
.box {
	width: 200px;
	padding: 20px;
	box-sizing: border-box;
	border: 1px solid blue;
}

.box2 {
	width: 200px;
	border: 1px solid blue;
}
Our code returns:
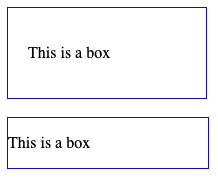
Both of our boxes now have the width 200px. The box-sizing property instructs our first box to retain its width even though the code specifies a padding value that under default conditions would result in a wider box.
Conclusion
The CSS padding property is used to specify the space that should appear between an element and its border. The padding property has four subproperties, each of which allows you to set the padding for an edge—or edges—of an element.
This tutorial discussed how to use the CSS padding property and its subproperties. We used examples to illustrate the concepts discussed here. Now you have the knowledge you need to start using the padding property and its subproperties in your CSS code like a pro!
About us: Career Karma is a platform designed to help job seekers find, research, and connect with job training programs to advance their careers. Learn about the CK publication.


